NMIT Moodle is a website providing course resources and learning activities for NMIT students. Not all courses at NMIT have materials in NMIT Online – your tutor will direct you to the site as appropriate. The site utilizes the internationally recognized MOODLE Open Source software platform.
To get to NMIT Moodle, go to http://ecampus.nmit.ac.nz/.

A glossary (![]() ) is a list of words defined by you or your instructor. Participants are able to view and comment on all entries. Your instructor may allow you to also add entries.
) is a list of words defined by you or your instructor. Participants are able to view and comment on all entries. Your instructor may allow you to also add entries.
Viewing the glossary
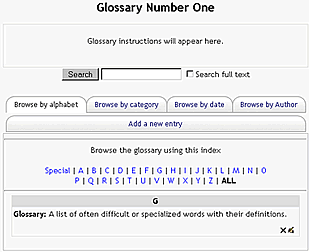
- Click on the glossary name to browse entries.
- You have various browsing options. The default is browse by alphabet letter.
Note: You may be able to comment on the glossary entry if the comment icon is showing. Click this icon to add a comment about the entry.
Add a new entry to the glossary

Add a new entry to the glossary - video
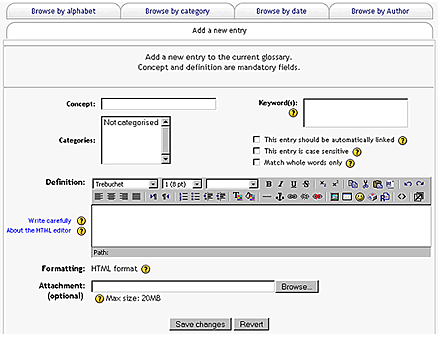
- Click "Add New Entry" to add a new definition
- Type the word you are defining or the name/title of your entry in the "Concept" box. What you put in here will show as the title for your entry and may differ according to the purpose of the glossary - your tutor will provide specific instructions.
- Write the details of your posting in the "Definitions" field. You can add links within your text and embed pictures from other websites (refer to separate page "Adding images to NMIT Moodle") as well as attaching a file directly to your entry (pictures or documents).
- Concept and definition are mandatory fields and your tutor may require you to Select a category and/or add keywords.
- Click "Save changes" to submit your entry.
Note: You may or may not be able to add a new entry to the glossary, depending on how the instructor has set up the course. If you can you should remember that everyone can view your entry.