Glossary: how to set up and use a glossary
This page covers:
- How is it set up,
- Using the glossary.
How is it set up?
In a course, with the editing turned on, choose 'Glossary' from the activity chooser.

Give it a name and, if required, a description.
Expand the other sections to sections to define the settings you want, in particular:
- Entries - decide if you want to allow editing of entries, duplicate entries, unmoderated entries etc
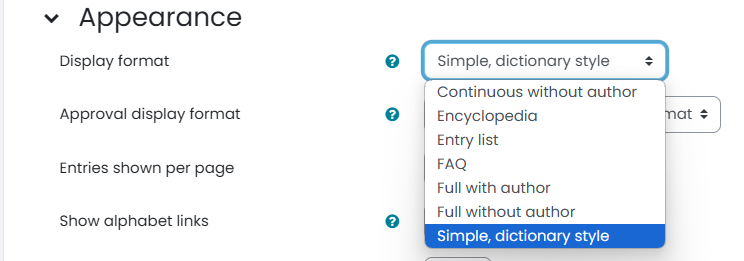
- Appearance - decide how you want the Glossary to be displayed. This affects the browsing options for students.
- Display format -This specifies the way that each entry will be shown within the glossary. The default formats are:
- Simple, dictionary style - This looks like a conventional dictionary with separate entries. No authors are displayed and attachments are shown as links.
- Continuous without author - Like the simple style. Shows the entries one after other without any kind of separation but the editing icons, but only if your theme supports it, you usually have to modify the theme if you want an alternative appearance to the simple setting.
- Full with author - A forum-like display format showing author's data. Attachments are shown as links.
- Full without author - A forum-like display format that does not show author's data. Attachments are shown as links.
- Encyclopedia - Like 'Full with author' but attached images are shown inline.
- Entry list - This lists the concepts as links.
- FAQ - Useful for displaying lists of frequently asked questions. It automatically appends the words QUESTION and ANSWER in the concept and definition respectively.

Click Save and display
Optionally, after the glossary is saved:
- Add an entry (by clicking on the Add Entry button) so students can see at least one example. 'Concept' is the word or phrase you are defining and 'Definition' is where you explain it.
Using the glossary
Students access the Glossary by clicking the activity on the course page. Or if the auto linking is set up then the concepts will be linked throughout the course.
Here students can browse the entries and interact with them depending on the settings or they can add a new entry.
The glossary is usually used to define terms as a student activity, however you may want to do this for the students to assist their studies. in this case once you have done it in one course, the terms can be imported into any other course and the next occurrence on the course, but this is a separate task from the course roll over, so you need to contact LITT to ensure that it happens.
Another really good use of the glossary is FAQ's about the course.
The Glossary can also be added as a block to the right hand side of the course to allow easy access on every page.